DIY Beeswax Candles (step-by-step)
The easiest way to make a nontoxic candle for your home! This step-by-step instruction walks through how to make a beeswax (or soy) candle from start to finish. These candles make the perfect gift and are the perfect DIY for a cold winter day.
Yield: 6 candles
Cost: $5
Equipment
- Saucepan for double boiler
- Wax canister or bowl dedicated to wax
- Kabob stick for stirring (or wooden popsicle sticks)
- Candy thermometer or old thermometer
- Wick trimmer or sharp scissors
- Jar Labels (optional)
Materials
- Glass jars old tea cups
- Fragrance oils 100 drops per 1lb of wax
- Beeswax or soy wax flakes
- Wicks
- Clothespins wick holders
- Wick stickers optional
Instructions
- First, prepare your candle container. It must be a heat safe container and should also be clean/ free of any food or debris.
- Next, using a double boiler, melt wax on the stove top. Simply add some water to a sauce pan and bring it to a boil. Pour the wax into the wax melting pot, and carefully place the melting pot into the sauce pan. BE SURE NOT TO BOIL OVER THE WATER IN THE SAUCEPAN. An old wooden kabob stick is a great stir stick to evenly melt the wax.
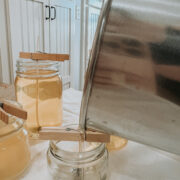
- While the wax is melting, place the candle wicks into the bottom center of the candle jars. I like to use candle wick stickers to secure the wick in place (place the sticker onto the metal base of the wick and then into the bottom center of the jar.) This helps hold the wick upright nice and straight. Use a clothes pin laid horizontally on its side to grab a hold the top of the wick tightly to keep the wick nice and straight and upright in the jar.
- Once the wax is melted, remove from the heat source and let it cool to about 120 degrees Fahrenheit. Allowing the temperature of the wax to cool will prevent damage to essential oils and eliminate air bubbles and holes in the candle wax as it hardens.
- Next, add fragrance (100 drops per pound of wax roughly) to the melted wax. Using the kabob stick or disposable wooden stick, stir the fragrance into the wax.
- Finally, carefully pour the hot wax mixture into the candle jars (with the placed wicks). Leave some space at the top of the jar, and ensure there is wick sticking above what is poured.
- Allow candles to cool completely (wax will harden) before moving. Trim the wicks before burning, and enjoy!
Notes
FYI - handmade candles make the perfect homemade gift.
Note - the amount of wax and fragrance used will depend on the size of the containers being used. A good rule of thumb is 2 lbs of wax per DIY session. I like to start there and melt more wax as needed and/or choose which containers I will use based on the amount of melted wax.